12.21.2012

Friday Faves: Holiday Glam

With all the fun Holiday parties this month I thought I'd share some of my favorite beauty items for a holiday look:


My version: 

1. Primer: It helps the foundation go on smoothly and you don't need to use as much of it either. I used to use E.L.F. Mineral face primer, at $6 it's really economical and I liked it.  However, I've recently switched to a Pinterest find: Monistat Chafing Relief Powder-Gel

Source: skindeco.net via Deann on Pinterest


I really like it and they say it's comparable to smashbox. I used a $2 coupon from Monistat and got it for $3.39 at Target.

Source: ebay.com via Sarah on Pinterest

2.  False eyelashes!  This is my newest favorite beauty item.  At first it was a bit scary and there was a bit of a learning curve.  Now that I know the ins and outs of applying them it's a snap and makes such a beautiful difference in the overall look.  First off buy Duo glue - it is the best and only glue that will last all day.  Also, one tube lasts forever!  I place a dab of glue on the package of my eyelashes and let it sit  while I take out the false lashes.  This lets the glue get tacky so the falsie will stick immediate.  Then I take a bobby pin, dip the ball end in the glue and then apply the glue on the strip of the lash. Place the falsie on your lash roots-trying not to get it on the eyelid but as close as possible.
My current fav lashes are by Ardell, they are made with european hair so they are more "real" looking.  Although I use E.L.F. lashes a lot - you can't go wrong for a $1.  I get at least 4 uses out of each pair, and if you clean them they can last up to a month supposedly.


3. Red lips: automatically glam up any look.  There are a few secrets to sucessfully pulling it off.  One make sure your lips are exfoliated and moisturized, any flakes will show up like crazy.  Use a lip liner to fill in the entire lip first, this will help your lipstick last.  Apply a layer of lipstick, blot and then apply another layer.
 Here are some of my fav red lipsticks (since I own like 20 of them):
NYC Sheer Red (shown above), This is a great lipstick if your nervous about wearing red lips. Its moisturizing and doesn't need all the layering tips I wrote about above, just glide it on.
 Besame Lipstick,  I ordered a sample pack when it was available and I love all their colors. These are very pigmented and opaque.  They take a little time to apply, which I like, it makes me feel like an old Hollywood movies star ( kind of).
Revlon Matte Lipstick In the Red, also for a more old hollywood look, but better on the budget.  I love the matte look and this one doesn't dry out my lips. I bought mine at WalMart
ELF matte lipstick in Rich Red, this is great for a base or liner too.  Easy application and lasts a good amount of time, no dry out: available at target.
NYC Extend Wear Lip gloss in Round the Clock Ruby, for super shine this is really fun. Great for New Years Eve.  Also from WalMarthttp://www.target.com/p/ardell-duo-eyelash-adhesive-clear/-/A-12391673?ref=tgt_adv_XSG10001&AFID=Google_PLA_df&LNM=%7C12391673&CPNG=Health+Beauty&kpid=12391673&LID=PA&ci_src=17588969&ci_sku=12391673

12.17.2012

34th anniversary!

This has been the best project I've ever made!
and the one that has made me the happiest!

Honey Do List

My amazingly talented husband has had a bit of a honey-do list since we moved into our house a year ago.  From a laundry chute, faux mantle and bookshelves that match to rain-gutter bookshelves in the kids' room, dog kennel, fire hydrant water-fountain and not to forget my totally awesome craft room!  He's always willing to oblige...and didn't fall short when I wanted a one of these for the front porch:


My sister-in-law gave us these 3 chairs out of her storage.  I knew immediately what I wanted done with them, but my husband went the extra mile.  One of the chairs had these cute arms so hubby decided to make sure that the bench got to use them!  He then cut off the seat of the third chair and fitted it in the middle of the other two.  Added a new board for the seat and attached all the chairs together. A coat of paint and voila.
I love it, and can't wait to spend my afternoons watching the kids play in the front while sipping lemonade...

12.14.2012

Rudolph Party

I threw a Rudolph party for my grands. We used the Vintage Rudolph Collection party printables from TomKat Studio for our invitations.  I had several activities and dinner planned.


 Each of the kids received their own handmade apron and reindeer ears.
We made gingerbread houses, had a hot cocoa bar, played musical chairs, watched the movie which was interupted by a surprise visit from Santa!  After Santa head back to the North Pole we had dinner and then decorated cupcakes for dessert.  The kids had a ton of fun.  Everyone got a gift bag for on the way home.

12.13.2012

Cheers

I'm working on the decor for our New Year's Eve party...here is a printable of the poster I've made for our photobooth for your pleasure, just right click and save image as:


Photobucket
I'll be blowing mine up at an office store and having it printed as an engineer print - 24x36 for $4! 
We have several parties coming up so look for those posts soon!

12.07.2012

Stockings are Hung

I have our traditional Christmas stuff in our basement family room.  The kids got to decorate the tree and help me put up the decor.  Is it really sad that all the decor I've been using for the past 8 years fits on one wall shelf and tree?  Oh well the kids love having their own to do.  I wanted to share how I hung my stockings:
In years past I used my board with hooks to hang all our stockings, but this year that hook thingy is up in the kitchen with aprons on it.  I really didn't want to buy 5 stocking hangers because that can add up quick...so I bought 2, at Walmart for $5 and then I painted a $2 dowel to match and hung all the stockings that way.  I saw the idea on Pinterest here and here.  You could use a curtain rod or painted pvc pipe too...

12.06.2012

A Very Vintage Christmas


I really wanted a vintage Christmas theme for my family room this year, and it all started with this Pin Board.


This silver beauty came from my in-laws.  It's a vintage aluminum tree!  I was so excited when they passed it on to me.  I purchased the old fashioned pastel ornaments from Walmart - its 101ornaments for $30 and shatterproof, which is a must around here.  I also bought their felt sparkly tree skirt for like $2. This set the color scheme for the rest of the decor.

After doing my Halloween haunted village I knew I had to do a Christmas one too.  I copied The 36th Avenue's village for this one too.  Here's her Christmas Village tutorial.


On the Mantle:

It was hard to get good pictures, these make it look a lot brighter than it is.  I couldn't find the right color candles for my candelabra so I painted these and added a bit of glitter on top.  I bought a fun funky silver garland from the dollar store and battery operated lights to brighten it up in the evenings.  Filled my bowl with leftover ornaments from the tree too.

And for the part I was looked the most forward to doing:

The bottle brush trees.  I purchased a package of 21 at Michael's with my coupon.  I've seen them at Walmart and Dollar Tree too.  I used canning jars and filled one half hot water and half straight bleach.  Throw in your trees and check on them in less than a minute. Hint:  If they don't bleach out in less than a minute your bleach is probably old and you'll want to try with a fresh bottle - I wouldn't know this from using a 6 year old bottle of bleach or anything.  The green trees were bleached for seconds just to lighten up the color.  I dyed the pink ones with liquid RIT in petal pink.  Just fill up a canning jar with hot water and pour in a bit of dye.  Drop in your trees and really watch them.  Some pick up the color really fast and if you want them pastel you'll want to pull them out right away.  The first picture of the village (that says Retro Christmas Village) is the most accurate for the color.

I also put up my Merry Christmas print I made:

Truly retro Christmas decor on a budget!

11.28.2012

Merry Printable

I've been busily decorating for Christmas and thought I'd share a printable I made for my vintage decor:
 

10.01.2012

Ghost Photography


Yesterday we took these fun "ghost" pictures of the kids.  I think they turned out great!
We went to visit a friend in Malad and stopped at this old school house.  It was literally two rooms!  I really wanted to steal the old doors ;)  Anyway I got the idea from Candice Stringham.


9.30.2012

Our Creepy Decor - Inside

The minute my husband hung my faux mantle I wanted to decorate for Halloween!
 The black cat was from Michael's, I grabbed it after I saw the cute bottle brush cats at Pottery Barn.

 These were left over from the Harry Potter birthday party.


 I fell in love with the creepy black birds on Anythingology.


 Spray painted pumpkins with metallic silver.


 And for my favorite part - the Haunted Village.  My kids love the creepy village at Michael's but I would never spend that kind of money on holiday decor, at least not Halloween.  This alternative saved the day.


The idea came from The 36th Avenue blog.  I bought a Dollar Tree Christmas village, people and trees and spray painted them black.  I added black glitter paint to the roofs.  I also cut off the bats of some bat rings, painted them with black glitter and glued them to the houses.  Super creepy!  I love it.

*She also has a solution from a Christmas village I wanted to make too....yes I'm already working on Christmas decor.

Our Creepy Decor- Outside


Outside:

This is a work in progress. I'm hoping to add a lot more pumpkins after our trip to the pumpkin patch.


This pumpkin head kit came from Dollar Tree.  We have a couple more to add to other pumpkins, I think it's so cute!

I got the idea for the haunted house from Decorating Ideas Made Easy.  It's made out of a plastic doll house I found at a thrift store, spray painted black and then I added the neon purple and glow in the dark green paint on top.


I'll be putting giant pumpkins on top of the porch planters.

My bat wall is inspired by this one at Country Living.


9.24.2012

Harry Potter Party - Halloween Crafts

My son wanted a Harry Potter party this year and since it was his year for a friend party (we only do them every 4 years) I wanted to make sure it was geared toward short attention spans :)!  I scoured the web for ideas, and there are a million, and used Pinterest of course.
 I used the invite idea from Just Sweet and Simple for our invites.  I opened the background page she has for a free download in photoshop and altered it to say my son's name instead of Harry Potter.  I used this for all the backgrounds of my signs.

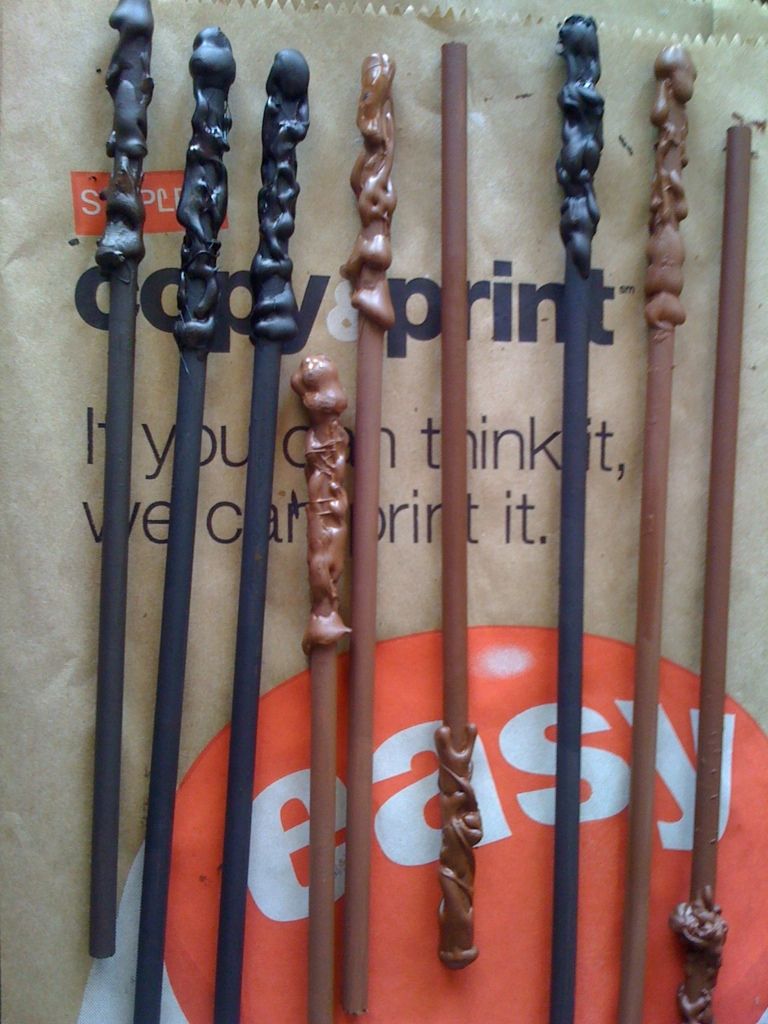
First up at the party was Olivander's Wand Shop:

Uploaded from the Photobucket iPhone App
I made our wands out of cut dowles and hot glue following the tutorial from Deviant Art.  These were super easy to make and I loved how they turned out.  They were the proudest part of the party for me ;).

We had each of the boys pick a wand out of the box with their eyes closed, grab their school text books and Hogwarts train tickets.  Spell book and Potions book found at Dirt and Sunshine


We then head through the 9 3/4 Platform.  This was a craft fail.  I used that corrugated brick banner stuff people use for faux fireplace chimneys at Christmas.  It just curled up on me, the kids didn't notice.  You can kind of see it in the picture above.  I printed the platform sign from here.


Downstairs we did the sorting.  Luckily my neighbor had a sorting hat for us to borrow! Super cool right?  I just printed off house badges and put them in a paper bag to pull out lotto style.  We then pinned the badge onto the boys' shirts. Next up was Defense Against the Dark Arts, where the boys used their spell books to learn how to use their wands.

 After the boys moved onto potions class.  I created this spell book after an idea I saw on Tiff Creative Outlet.  I made the spell pages in photoshop and taped them to a thrift store book.  I painted the edges brown and bent the page corners.  Cute right?


We did the Mandrake Restorative Draught from Dirt and Sunshine - it was a huge hit!  This was the boys' favorite part.  They got to see their potions bubble up and change color twice.  It was really fun.  I printed her bottle lables and potions books too.

After potions the boys played capture the snitch.  We hid a gold Christmas ornament before the party and had the boys run around on their broomsticks looking for it.  Then it was time for Honeydukes:

I made the candy labels in photoshop to look like the ones in the real Honeydukes in Orlando.  I printed the Butterbeer labels from Karen Cookie Jar.

 My mom took a graduation robe we found at the thrift store and shortened it for my son.  She also crocheted his scarf with this pattern, I know she only did half the width that it called for and it was plenty wide.  He's going to be Harry Potter for Halloween too and we got him a gryffindor tie for his birthday.

Overall I think it was a success.  The kids all had fun and my son was super happy.

Here's the candy labels if you want them.